Wednesday, June 9, 2010

Vapor Barrier Finally Done

I got off work a little early today and headed down to the house to spend a few hours trying to get something, anything, done. And I did. Three hours later I had completely finished putting up the vapor barrier on all the exterior walls.

The little bedroom and its closet.


Same closet seen again through the utility room.


The main bathroom, above the bathtub. This is right next to the little bedroom's closet. The entire closet and where the bathtub sit used to be the closed-in side-porch of the house, but served as apartment 1's hallway when I bought the house.


Master bedroom, above the windows. This looks easy to do, and it's not hard, but on top of a ladder fighting with a utility knife, a hammer stapler, and a sheet of uncooperative vapor barrier is quite intense.


The closet off the master bedroom's bathroom. This closet just about did me in. The ladder wouldn't fit into the space all the way so I was all kinds of cantilevered in there. But I won!


Above the master bedroom's tub. This space was easier, I guess because there was a corner and that piece of a wall?


And the top of the rest of the bathroom, along where the toilet and vanity will be.


Between the last work day and today, we used 5000 staples. Of course some of them escaped or didn't take or went flying across the room. But that's another story. I will tell you this, though, after about 5000 staples, you can really get a good idea of how to use a hammer stapler.


Back out front, as I was leaving, a friend greeted me:

The daylilies seem to be doing much better now that they don't have to compete against the weeds anymore.

They're still a little puny, but they are trying to bloom! And with a little love, and a nice transplant, I think they'll do well in my yard.

But let's get the inside finished first.

I got the estimate from the Sheetrock Guys. It's a go! They'll start as soon as I get the rest of the insulation up, which I plan to get done this weekend.

Sunday, June 6, 2010

Insulation Day 1

That's right, folks! We're at the insulation stage. Who knew that it would take three years to get here, but there's a season and time for everything, right?

I was joined back down at the house today by Mama and my two teenage brothers. It was hot and extremely humid and we were very thankful to have this wonderful invention plugged in to the master bedroom:

It's a secondhand refrigerator from one of my Father's rental properties. He needed to move it and I needed a frige, and so the other night he and I brought it to town. It is fairly filthy, and the refrigerator part isn't particularly cold, but the freezer part is excellent for storing bottles of water in. And so refreshing! Hopefully I'll be able to clean it up and maybe tinker with it to get the refrigerator part working better. But hey, it's free and I'm not one to turn down appliances.


But back to the work...

The boys mainly measured and cut insulation while I put up the house wrap and Mama put up the insulation. The boys sped things up remarkably and we couldn't have gotten it all done without them. And lucky for me, Mama's put up insulation before so she knew what she was doing.


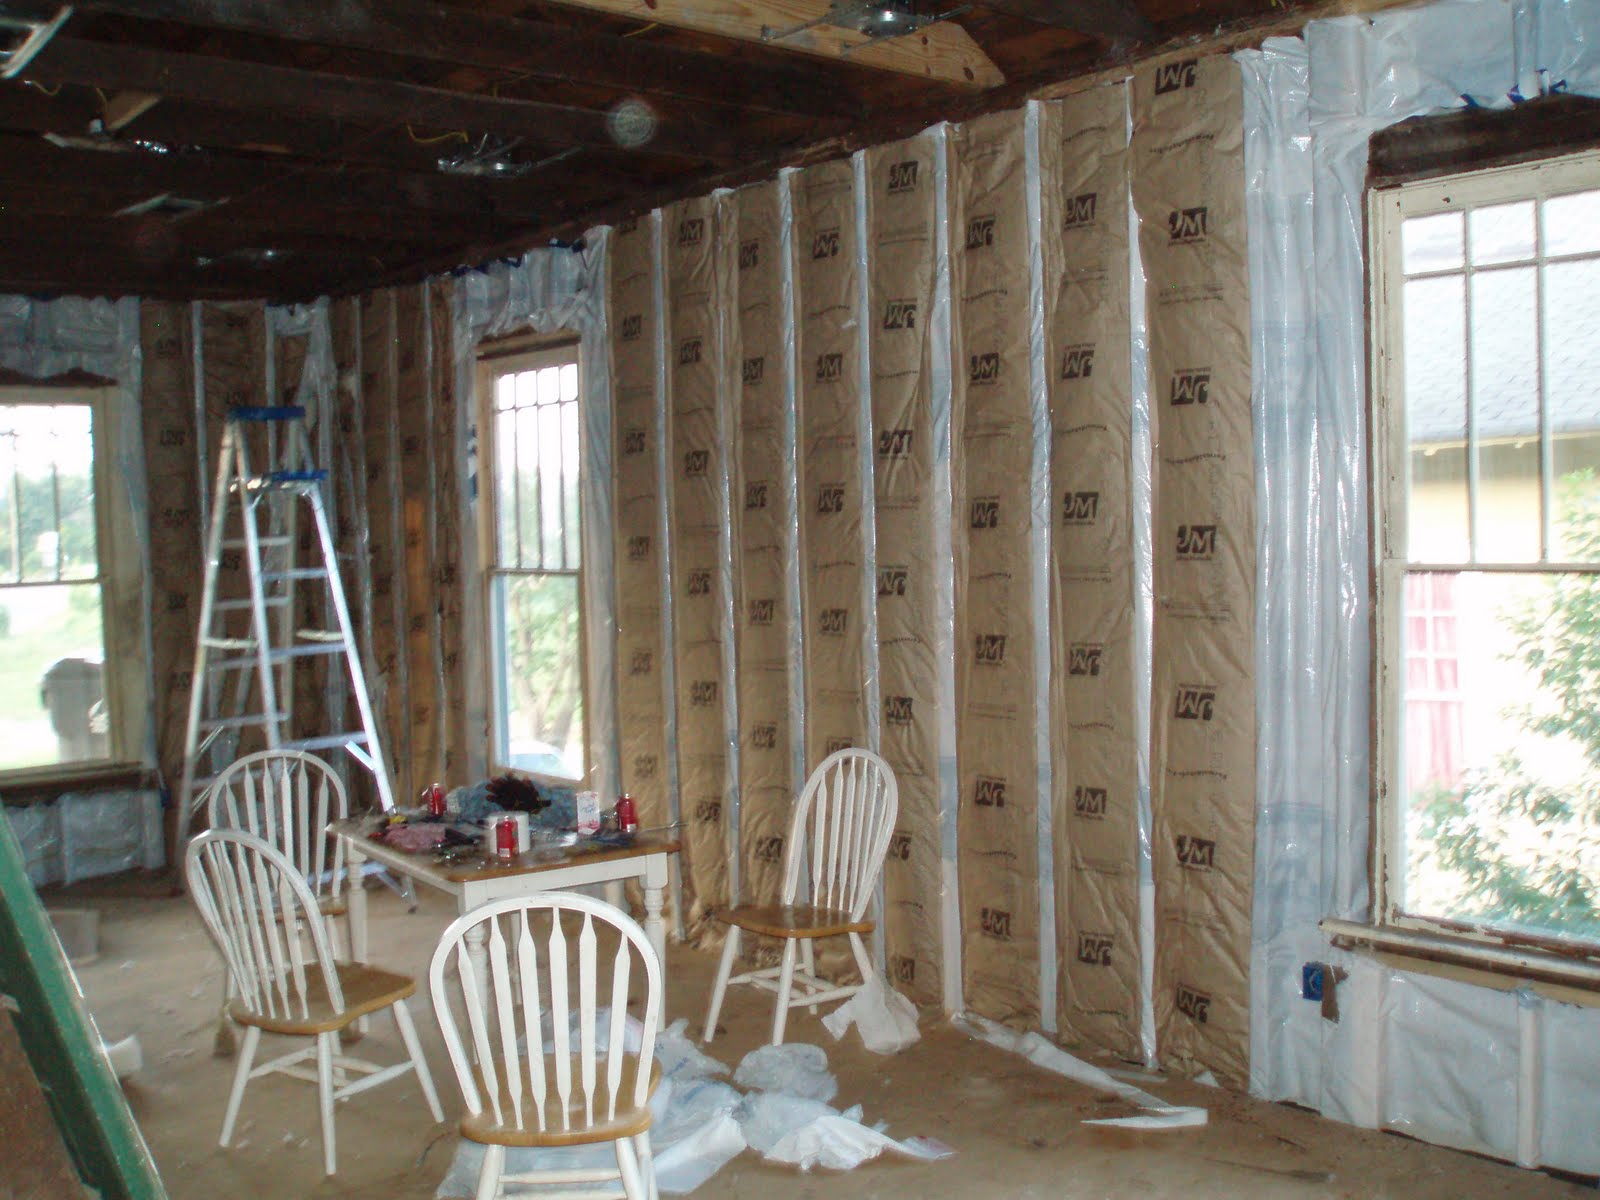
Isn't that one of the most beautiful things you've ever seen? You're looking at the foyer wall, the room that used to be part of the porch. I took a picture of the front door wall, too, which is done, but so much light comes in, it's impossible to get a picture that's not dark.


I started off in the kitchen, and worked my way through the great room, finishing off the housewrap in about a one foot strip around the top of the rooms. My ceilings are 10'1'' and the wrap comes in rolls of 9'. This picture is the exterior wall of the little bedroom.


This shot is looking towards the front of the house. This wall is almost done, too. Mama and the boys hung the long strips first, then did the angled ones, and are saving all the smaller spots, like above and below the windows, for the scrap left over at the end instead of cutting into new rolls.


This is a table and chair set I inherited from my sister (thanks!), which came in handy today, too. The wall behind it is done. With two people on ladders, one of the boys spent a lot of time refilling my and Mama's stapler. When we ran out, we'd yell that we were "out of bullets" and they would come refresh our hammer staplers.


This is the same wall, but now from the kitchen view. I finally got the area around the kitchen window done; it's where I left off last time when my stapler got jammed.


And here we have the back wall of the kitchen, looking out onto the back porch, but don't look at Mama (taking a much deserved break), she didn't want her picture taken. From here it almost looks like I have a green lawn, but really, it's just trimmed weeds. The lawn will come later, though. For now, just squint your eyes a bit.

We got a late start, but we got a LOT done, half the house is insulated! It's amazing how much more of a house insulation going up makes it look. Maybe because I'm one step closer to having walls, or maybe it's the way the brown craft paper reads as a solid surface... I'm not sure, but it's a very great feeling to know that from where I started, I took it all down, had it put all back, and now am being able to close it all up again.

Oh yeah, I passed all my inspections, too. Electrical, Plumbing, HVAC. It's all ready to go and waiting on me to finish the rest of the wrap and insulation.

And maybe, just maybe, we'll hear back from the Sheetrock Guys who came in to look at the house last week!

Thanks again to Mama and the boys today. I couldn't have done so much without you.

Yard Day 2010 After Pics

A larger crew went down to the house today and we worked inside, but more on that later. After we called it quits for the day, I remembered to run outside and get those after pics from Yard Day 2010, last Wednesday.

Looking from the back yard towards the front. I just liked the way this one turned out, with the gate. It seems to beckon you to walk this way.


I didn't get a picture of the back yard before, but if you look towards the back, you can see my neighbor's yard. My yard matched his overgrown-ness. You can see a clear line now in the back and visually can determine where my yard ends.


This is from standing on my lot line, looking towards the back of the house. We have big plans for this yard, privacy fences, patios, a tilled and centipede grass planted lawn... Pay no attention to Mama. She didn't want to be in the pictures but wouldn't move.


One of two random concrete piles. It's not that bad, but will take a sledgehammer to break up.
These were left over from the work on pouring the back porch.


We found so much glass! But I have little to no idea where it all came from. I salvaged the windows in the house. We're very carefully collecting all the glass we find. Bare feet and glass in a back yard don't mix well.


This is the other concrete pile. It's not that thick. This one is right off the back porch, where they had the mixer.


Back around to the front:

The area to the left of the front steps where all the wood scraps were.


The front yard from the porch. You see the new home for the scraps.


The side yard looking towards the back. I still have a little left to clean up from behind the air conditioner. There's a toppled pile of bricks back there that need to be re-stacked for a future incarnation as a back patio. For now it's an excellent place to twist your ankle.


A more intimate view of the wood pile. I'm still trying to figure out a way to get rid of this without renting a dumpster, like I have before. The city won't pick it up. Notice the Wal-Mart buggy: remember it from the earlier post? ALL that trash came out of my back yard, including at least 6 or 7 dirty baby diapers. The neighbors on that side just threw their trash in my backyard as they had been doing for years...


Across the street view. The yard looks one hundred percent better. Still progress to be made, but at least it has been tamed.


There are already plans in the making to repair the brick steps. And ground cover has been picked out for planting on the sloping bed out in front of the house. And I think I'll move my mailbox to the front porch, where it was when I bought the house. I still haven't gotten any mail here, but I haven't changed my address, either.

Much improved. Stay tuned to see what happened inside today!

Yard Day 2010

After five months of almost no work going on down at the house, things are back on track. New Guy contractor that I was using did great work, but his prices kept going up. And his last bids were ridiculous. In addition to that, I had to take some time aside myself to work out funding for the house project. A lot of my readers kept asking me why I wasn't updating and were encouraging me to get back to work, and believe me I wanted to. Thanks for cheering my progress on!

Wednesday, June 2, I had a day off and Mama and I decided that it was time to tackle the yard again. It hadn't gotten horrible, but it definitely needed some attention. Here are the before pictures:

Weedy with debris!


Scraps from the work done last winter.


Overgrown... but is that... a buggy? From Wal-Mart?


Yes. Down South we call grocery carts "buggies". And I suspect my neighbors had something to do with this one being abandoned in front of my house. If you look closer, you'll see a toilet seat too. But I wouldn't look closer if I were you.


The side. sigh. The neighbor on this side is great. She looks out for me. And she always keeps her lawn cut. But she does nothing with this and it's almost completely all on her side of the retaining wall. But I can tame it, and she doesn't care what I do here, so that's a bonus. And at least it's not bamboo!


The yard got so bad even the weeds died... out of spite.
But I did find three or four daylilies, they are the ones to the right of the jungle mess, with the yellow and green leaves. They even want to bloom but the yard was choking them. This was a great surprise and I felt like someone might be smiling down on me and encouraging me.


And so those are the "befores". My camera battery rebelled from non use and decided it was too tired for after pictures, so those will have to come next, in another post.

The good news is that about 5? 6? hours later the yard no longer looked like this. Two very sweaty and tired people later, it was trimmed, mowed, weed-wacked, and tamed. Thank you Mama for all of your help!

Tuesday, January 19, 2010

Vapor Barrier and Insulation Days 2, 3, & 4

I had a three day weekend off this past Friday, Saturday, and Sunday. The weather warmed up and I was able to get a good bit accomplished with the vapor barrier.

But first, remember my dormer windows?


This is what they look like inside:


I had to climb up for some reason and had never seen them, so I snapped a picture, to share and remember. Once the ceiling goes up, I may never see this side of them again.

On to the work:

Friday, I got the front wall and the Living Area done.


Saturday I got the Dining Area completed.


And Sunday I worked in the kitchen, trying to finish it up until my stapler jammed.


I banged it around for about 15 minutes, which usually releases it, but was unsuccessful. So I called it quits. Later my Dad worked on it until it popped open again.


Friday New Guy Contractor came over to check out some studs for me- they had old surface termite damage and I wanted to make sure they were okay before I covered them with the vapor barrier- and he brought me this:


Free random insulation that was taking up room in his workshop!

---

I spent a lot- A LOT- of time this weekend taking nails out of studs, probably almost as much time as I spent putting up the vapor barrier. But it had to be done for my purposes, and for the dry wall to come. And I was working by myself this weekend which was both kind of cool and also very lonely.

I only lack a small section in the kitchen, one wall in the small bedroom, and one wall in the small bedroom's closet. And the top foot around the top of the exterior walls all around the house, since my vapor barrier was 9 feet tall and my ceilings are 10 feet.

I don't have much left. Then time for the insulation!

Tuesday, January 5, 2010

Vapor Barrier and Insulation Day 1

Sunday, January 3, 2010

We took a little break from the house work since the week before Christmas. I was out of state about a week, Then it was Christmas, then it was New Year's. All in addition to having a heavier work load at my job.

And also I was waiting on bids from New Guy. I got those in but they were too high, so we've been paring down what's left to be done to the house before move in into What Has to Be Done and What I Can Do. I'm all about saving some money where I can, and this is usually in regards to labor instead of materials.

And let's face it, I'm on a budget. I have more time than money and my goal here is to finish the house to move-in condition for HALF of what it would cost to have New Guy and crew finish it out. It will take me a little longer, but it's saving me lots of money.

So Sunday after New Year's my dad and I set off on a mission to Lowe's. And Wal-Mart (twice)... and the house project he's been working on currently to borrow a few tools. We had ready:

A trusty 9' ladder I affectionately call the 'death trap',


2 9'x 150' rolls of Lowe's branded vapor barrier,


10 rolls of R13 rated insulation,


a staple gun, staples, duct tape, gloves, 2 utility knives, a newly purchased radio/boom box, (since the other one I had on the job site walked off last year, sometime),


a tape measure, a hammer, and a portable heater.


Then we set off to work. We decided to start on the new back wall in the kitchen with the vapor barrier. In new construction, it goes on the outside of the house, between the plywood sheeting and the siding. Since I have no sheeting, I decided to put it up on the inside, facing out.


My dad, ready, and the beginning corner in question behind him. It was cold, really cold, really, really cold, in the house. I think the temperature was around 28 degrees, but I don't know what the wind chill was.

It took us a while to get our groove going, and the stapler we had was giving us fits, until it finally gave up and would staple no more, hence the second trip to Wal-Mart. It seems like an easy task, to wrap the barrier around the studs, and it was, but it's time consuming to get it right.

By the time we took a break to eat we had the back wall in the kitchen done,


and into the bathroom, up to the bathtub, where New Guy and Crew had already put it up before installing the bathtub.


I was told I didn't need to do this step by New Guy, if I wasn't going to blow in insulation. But I figured for a very minimal cost I could vapor wrap all the outside walls of my house, and provide another barrier, so why not? We could definitely tell, even only getting this far, how much it blocked the wind from coming in the house.

After we ate, we came back and tackled behind the hot water heater and in the closet off the Big Bedroom,


And also across the wall in the Big Bedroom. At this point it was too dark to really do much more and we were cold and hungry again.


We ran errands before starting, but we probably weren't actually working but maybe 5 hours. And we probably got a good 3rd of the house done. We will come back and overlap the barrier by a foot or so up top to get the little bit the roll wouldn't cover, but I figured I could do that my myself.

And then goes in insulation. We bought some just to see how far it got us along in the project.

My Dad said that you know you've done it right when it looks easy, when it looks like there's nothing to it.

Hopefully I'll be able to get back down there for more progress soon.