Tuesday, June 22, 2010

Dining Room Cabinet Days 5 & 6

Another 11.5 hours of work got me from here:

(front of one set of lower cabinet doors)

to here:


And the back side:


And the other set, front:


and back:


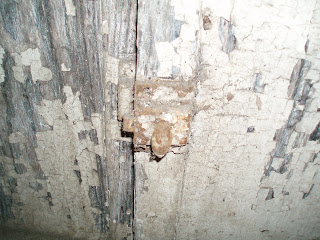
I also began working on the opposite side of the base cabinet, the one with damage.

There's a chunk missing of the lower right hand side. When I used the wire brush on it, it began chipping away due to past water rot or termite damage. I found no active bugs, though. Or dead ones.

Sheetrock Guy is actually a master carpenter. He came over this afternoon to give me some prices on materials for the job and suggest a flooring material. I showed him the my project and he said he could rip down a piece of heart pine, which my Dad has, and create a piece of moulding to cover or camouflage the damage, rather than replacing the whole piece or trying to piece it in.

Once I'd seen the extent of the damage I was let down a bit, but now I have renewed encouragement to continue on because of his solution. It may not cover it completely, but I'm okay with that. It just goes to show the piece has history.

I was actively working on this side when I realized it was after midnight. I decided it was time to clean up, shower, and blog. Especially since I have to work tomorrow.

Friday, June 18, 2010

Dining Room Cabinet: Day 4

After work today, another 5.5 hours got me here:

I started scraping the front while I was giving the stripper time to work.
And, yes, it is on its end.


It works much better than holding tools sideways.
Let gravity work with you. That's what I learned today.


I also began working on the opposite end, too.
The bottom pieces here (and a back piece) may need to be replaced due to water rot.
Luckily, we happen to have some old heart pine boards to use.

More work was done on the hutch, the right side.

I'm undecided about the interior. It was suggested that I strip the shelves but paint the bead board backing. The bead board is going to be almost impossible to strip. We'll see.


The wood is turning out beautifully.


And it has so much character.

What seemed impossible a few days ago has now become an addiction. I could work on this all day long. I may have found a new hobby. I've begun eying other pieces in the shed...

Wednesday, June 16, 2010

Dining Room Cabinet: Day 3

When the sun went down yesterday, I had to quit work because there was no light. Today I got a work light from my house, but had to quit when it started raining.

But another four hours work got me here:


And here:


The biggest improvement, though, is here:


And here:


And here:


It still needs some more work, but what an inspiration to keep going!

Monday, June 14, 2010

Dining Room Cabinet: 2 Days Later

I started work on the cabinet Sunday afternoon. I worked on it today after work some more, too. All in all, about 7 and 1/2 hours so far.


Here's the base.


And the two pieces, separated.


I started taking the doors and hardware off.


Here's one side, done completely with a belt sander and steel brush.


And the top of the base, done with the sander, brush, and a 'green' paint stripper I picked up today.


I was skeptical about the 'green' product, but it really does work.
You can see the board in the back that I have barely worked on.
This is from only two applications of the stripper.


The right side seems darker. I don't know if it's from a past water issue or what.
It doesn't bother me. It adds character.


On this side, I wanted to try out the paint stripper by itself.


Followed by a paint scraper. Looks pretty good for only one coat of stripper.

I'm surprised at how much I enjoy this project. It's like unwrapping a present. It doesn't seem like hard work, even though it is. My back and legs and arms are sore from scraping. And the days have been really, really, hot- 96 degrees and above. But still I find myself out there working happily in the shed.

Sunday, June 13, 2010

Introducing: A Side Project

There's a man I know who hardly ever throws anything away. I wouldn't say he's a hoarder, but I do know that he keeps what he sees value in. His wife, however, does not like his collection. In fact, he only has one shed left his back yard to keep his collections in. Three others were torn down.


This man is my father. Throughout any house project, he salvages what otherwise would have been thrown away. While watching television yesterday, I remembered an amazing piece that has been sitting out in the shed for a while.

About 21 years, to be exact.


The shed is not exactly organized, but he and I know if you poke around in there long enough, you can find what you were looking for. Or at least, something similar you can use.


After moving two lawnmowers and some other yard equipment, I began coaxing the piece out.


There it is. The one in the back corner.


I still have to move some more stuff to see what kind of shape it's in.


I have no idea where the drawers are. But I see bead board panels on in the back.

We still need to dig it out some more.


Here's a proper look at the bottom piece. It doesn't seem to be in too bad of shape.


Once the smaller cabinet is moved... You can see it.

This piece was originally built into the butler's pantry in my parents' house.

It's about 120 years old, as old as the house. They had to take it out to make room for a pantry and breakfast room.


The piece actually had to be sawed in half to get it out of the house. So the top part is a hutch now, sitting on the base.


It still has most of the original hardware, but some of it needs to be replaced...

Some of the glass is broken or missing...

And drawers will need to be built...

But it has tremendous potential. I see it as a dining room china cabinet.

Sometimes it's great to hold onto things.

Saturday, June 12, 2010

Insulation: Last Day

My brother-in-law came over early this morning, around 7:30. We attempted to beat the heat today working down at the house. It didn't work. Two Lowe's runs and 10 more rolls of insulation later, we were done. I think that makes 29 rolls total used, in addition to what was donated by New Guy Contractor.

Inside little bedroom, looking towards the closet and utility room. We insulated this little cube in the middle of the house for noise reduction, mainly, in an effort to tame laundry room and bathroom noise.


In the little bedroom's closet, the wall behind where the washing machine and dryer will be. We didn't insulate behind the bathtub so that the plumbing would be accessible.


Back in the Great Room, the entrance to the utility room.
The square at the bottom right is the air return.


Inside the utility room.


Inside the master bedroom, looking towards the main bathroom. Hopefully this wall will reduce the noise of the someone showering or the toilet flushing in the main bathroom.


Inside the master bath, looking into the closet. I took out the sliding doors for the closet to work.


The master bath, looking towards the corner where the hot water heater will be tucked away.


The vanity/toilet wall in master bathroom, and above the bathtub.


The pictures seem a little blurry because of all the dust. After work was done for the day, we cleaned up behind ourselves, swept, and shop-vac'd.


We were done around 3pm, very tired and sweaty but glad to have gotten all the insulation accomplished. My best friend came over and helped us in our last leg of insulation, made a food run, and manned the shop-vac while I swept.

Much thanks to my brother-in-law and best friend for all their help today! Especially once it was clean, it really is looking like a home.

Oh, and my brother-in-law went on a wasp-killing spree and used almost a whole bottle of spray. They weren't paying rent, dived bombed us a few times, and weren't very welcoming. They were evicted.

Sheetrock work will start either this week or next...

Friday, June 11, 2010

Insulation Progress

I'd made arrangements today so that after work my brothers and their friend would come help me hang insulation. My brother-in-law also volunteered for the task, so a little after 5pm, and a short trip to Lowe's for more staples, we were on our way.


The little bedroom's exterior wall. Done.


The little bedroom's closet exterior wall. Done.


The main bathroom's exterior wall. Done.


The master bedroom's exterior wall. Done.


The back exterior wall of the kitchen. Done.


The side exterior wall in the kitchen. Done.


The Great Room's long exterior wall. Done.
My father showed up after work, too, to help finish the kitchen. He gave us a much needed second wind.


The front exterior wall of the great room. Done.


All I have left, exterior wall wise, for insulation, is the master bedroom's bathroom and closet. Three of its four walls are exterior.

I also want to surround the utility room and the main bathroom in insulation, more for noise reduction than anything else. And I might do the same between the master bedroom and its bathroom. That would only leave me three interior walls left not insulated. They might get insulated, too. Why not?

Tomorrow my brother-in-law and brothers are going to help me finish with the exterior walls. We may get started on the interior walls, as well. My best friend may come over and my good friend from work wants to see my progress, too.

All our progress makes me incredibly happy and proud. The hard work, and friends and family willing to help out, make me feel blessed and loved, too.

This house is slowly but surely becoming a home.